Show Posts

This section allows you to view all posts made by this member. Note that you can only see posts made in areas you currently have access to.


Messages - RAnDOOm

Pages: 1 ... 98 99 [100] 101 102
1486
It got removed due to copyright lawsuit.

April fools joke?

No no... it was the real deal.   :-\

1487
Good news.

Friday night is going to be a blast!

1488
It was a great battle. Thanks to everyone that joined.

1489
General Discussion / Re: Torrent for 2.26 HERE!
« on: 12-05-2010, 16:05:59 »
Uploading at 10Mbps

Just wanted to share so that everyone will be able to play Friday night.  ;)

1490
Looking forward to it!

1491


Do you want to repeat all the great experiences that you had on FH1 ?

Now you can and with confirmed 64 players for 4 whole hours.

Play a Forgotten Hope 1 campaign spanning 13 battles across the Southeast Asia.

32x32 players every Saturday

This battle will be played Saturday 8 of May at 20hGMT on Forgotten Honor Tournament

Battle over Mogaung


Battle over Mogaung, Burma, June 27, 1944.


The 3rd Battalion 6th Gurkha Rifles were part of 77 (LRP) Brigade commanded by Brigadier ‘Mad Mike’ Calvert, acknowledged as Orde Wingate’s most tenacious Chindit commander. In early May, the two 3/6th columns were reunited as a Battalion, now commanded by Lieutenant Colonel Freddie Shaw with Major Jimmy Lumley as his Second-in-Command .

Having held off superior Japanese forces for two months from their stronghold ‘White City’, 77 Brigade were ordered north to bring pressure on the Japanese opposing Stillwell’s Chinese in the area of Mogaung. The 160 mile approach march to Mogaung was marked by a series of bloody encounters. The monsoon had broken and conditions were appalling; malaria and typhus were rife. At the end of May, Stillwell ordered 77 Brigade to capture Mogaung itself. 14th Army intelligence, backed by hazardous patrols from 77 Brigade, showed Mogaung to be held by 4,000 Japanese.
By the time 77 Brigade launched its main assault it was reduced from an original 3,500 to a fighting strength of less than 550 men. The Lancashire Fusiliers, King’s Regiment and South Staffords between them could only muster 300 and the 3/6th Gurkhas had 230 left fit.


The plan was to advance on the town using the Pin Hmi road as an axis . On the 11th June, Captain Michael Allmand’s heroic feat in ensuring the capture of the Pin Hmi Inn road bridge was the first of the exploits for which he was awarded the Victoria Cross. The second occurred on 13th June in the fighting to secure a ridge closer to the town. By now Allmand had taken over command of B Company because of casualties among its officers.

Over the next few days Chinese forces came alongside 77 Brigade to face Mogaung. Although their infantry played no part in the final attack, their 75mm guns provided 77 Brigade with their only artillery.


At first light on 23rd June the final assault was launched. Earlier reconnaissance had pin-pointed the ‘Red House’ as a likely trouble spot. It was Rifleman Tulbahadur Pun’s single-handed gallantry as part of B Company’s attack on the ‘Red House’ which earned him his Victoria Cross. The third specific outstandingly brave action by Tulbahadur’s Company Commander, Michael Allmand, provided the inspiration which lead to the capture of the railway bridge. Sadly, Allmand was mortally wounded and died that night from his wounds. Fierce fighting continued throughout the day and that night. The following morning, a cautious advance into the town found that the Japanese had abandoned it. Mogaung was the first main town in Burma to be re-captured.


The Battalion was now ordered to garrison Mogaung. They remained there until 5th July before marching a further 50 miles to be flown back to India. Whilst in Mogaung, the Battalion took the opportunity to hold a small ceremonial parade and hoisted the Union Jack on a large pagoda, the most prominent building left standing. It was fitting that the Battalion should have the honour of doing this as it had given of its best in capturing a town whose name will ever rank among its finest achievements.

But the cost had been high. Since flying into Burma less than four months earlier, 3/6th had suffered a total of 485 casualties:


1492


Do you want to repeat all the great experiences that you had on FH1 ?

Now you can and with confirmed 64 players for 4 whole hours.

Play a Forgotten Hope 1 campaign spanning 13 battles across the Southeast Asia.

32x32 players every Saturday

This battle will be played Saturday 1 of May at 20hGMT on Forgotten Honor Tournament

Battle of Kohima


Battle of Kohima, India, April 5, 1944

From April 3 to April 16 1944, along the siege of Imphal, the Japanese attempted to capture Kohima ridge, a feature which dominated the road by which the major British and Indian troops at Imphal were supplied. Plan involved sending the Japanese 31st Division (which was composed of 58 Regiment, 124 Regiment, 138 Regiment and an Independent Mountain Artillery battalion) to capture Kohima form Indian XXXIII Corps and thus cut off Imphal, and then exploit to Dimapur. The division's commander, Lieutenant General Kotoku Sato was unhappy with his role. He had not been involved in the planning of the offensive, and had grave misgivings about their chances. He had already told his staff that they might all starve to death.

Attack started on March 15 and on March 20 the left wing of the division, 58 Regiment, commanded by the division's Infantry Group commander, Major General Shigesaburo Miyazaki clashed with Indian 50 Parachute Brigade under Brigadier Hope-Thompson, at Sangshak covering the northern approaches to Imphal on March 20. Battle lasted six days and after lost of 600 men, Hope-Thompson withdrew.


At this point, the newly raised Assam Regiment fought delaying actions to the east of Kohima, giving time for 161 Brigade to reinforce Kohima ridge, but the only battalion arriving before the Japanese cut the road west of the ridge was The Queen's Own Royal West Kent Regiment.

The siege began on April 6. The garrison was remorselessly shelled and mortared and slowly driven into a small perimeter on Garrison Hill. They had artillery support from the rest of 161 Brigade, themselves cut off two miles away at Jotsoma, but, as at Sangshak, they were very short of drinking water. The dressing stations were exposed to Japanese fire, and wounded men were hit again as they waited for treatment. Some of the heaviest fighting took place around the DC's bungalow and tennis court, in what became known as the battle of the Tennis Court. By the night of April 17, the defenders' situation was desperate.

On April 18 161 Brigade in turn broke through to Kohima and counter-attacked to drive the Japanese from the positions they had captured. After 15 days of fighting the surroundings of Kohima resembled a battlefield from the first World War, with trees smashed and the ground covered in craters. The battle ended on June 22 when British and Indian troops from Kohima and Imphal met at Milestone 109, ending the siege of Imphal. It marked the limit of the Japanese offensive into India in 1944 and was described as the "Stalingrad of the East".


1493


Do you want to repeat all the great experiences that you had on FH1 ?

Now you can and with confirmed 64 players for 4 whole hours.

Play a Forgotten Hope 1 campaign spanning 13 battles across the Southeast Asia.

32x32 players every Saturday

This battle will be played Saturday 24 of April at 20hGMT on Forgotten Honor Tournament

Battle of Imphal


Battle of Imphal, India, March 15, 1944


From March until July 1944 Japanese armies attempted to destroy the Indian IV Corps blocking their invasion to India at Imphal. In detail, under the name Operation C the Japanese 33rd Infantry Division under Lieutenant-General Motoso Yanagida would destroy the Indian 17th Infantry Division at Tiddim, then attack Imphal  from the south; Yamamoto Force, formed from units detached from the Japanese 33rd and 15th Divisions under Major-General Tsunoru Yamamoto, would destroy the Indian 20th Infantry Division at Tamu, then attack Imphal from the east; the Japanese 15th Infantry Division under Lieutenant-General Masafumi Yamauchi would envelop Imphal  from the north and in a separate subsidiary operation, the Japanese 31st Infantry Division under Lieutenant-General Kotoku Sato would isolate Imphal by capturing Kohima, then exploit to Dimapur.


Because the Allies were planning to take the offensive themselves, Indian IV Corps units were thrown forward almost to the Chindwin River and widely separated. Mutaguchi intended to cut off and destroy the Allied units in their forward positions and then capture Imphal. Indian IV Corps in Imphal was commanded by Lieutenant-General Geoffrey Scoones, and was in turn part of the British Fourteenth Army under Lieutenant-General William Slim. When they received intelligence that a major Japanese offensive was impending, Slim and Scoones planned to withdraw into the Imphal plain and force the Japanese to fight with their logistics stretched beyond the limit. However, they misjudged the date on which the Japanese were to attack, and the strength they would use against some objectives. The Japanese launched their troops across the Chindwin River on 8 March 1944. Scoones only gave his forward divisions orders to withdraw to Imphal on 13 March.  


From the beginning of April, the Japanese attacked the Imphal plain from several directions. 33rd Division attacked from the south at Bishenpur, where they cut a secondary track from Silchar into the plain. Yanagida, its commander, was already pessimistic and depressed by the failure to trap the Indian 17th Division. He had also been rattled by a garbled radio message which suggested that one of his regiments had been destroyed at Milestone 109. He therefore advanced cautiously. By doing so, he may have lost a chance to gain success while the Indian 17th Infantry Division was resting after its retreat and Bishenpur was held only by Indian 32 Brigade (from 20th Division).


 Mutaguchi removed him from command. Meanwhile Yamamoto Force attacked the Shenam Saddle on the main road from Tamu into Imphal. The Shenam Saddle was ideal defensive terrain. Despite using heavy artillery and tanks, Indian 20th Division's well-sited defences could not be destroyed. 15th Division encircled Imphal from the north and its 60 Regiment captured a British supply dump at Kangpokpi on the main Imphal-Dimapur road,but the depot had already been emptied of food and ammunition. 51 Regiment seized the vital Nunshigum Ridge, which overlooked the main airstrip at Imphal. This was a major threat to IV Corps, and on 13 April the Indian 5th Division counter-attacked, supported by massed artillery and the M3 Lee tanks of the 3rd Carabiniers. The Japanese regiment had no anti-tank weapons, and their troops were driven from the ridge with heavy casualties.


1494
Nice news update.

I really want to play this Friday.

1495
Playing as the Dutch, yay!

You won't take that island japs!

Beach assaults!!!

BANZAI!!!!!!!

1496


Do you want to repeat all the great experiences that you had on FH1 ?

Now you can and with confirmed 64 players for 4 whole hours.

Play a Forgotten Hope 1 campaign spanning 13 battles across the Southeast Asia.

32x32 players every Saturday

This battle will be played Saturday 17 of April at 20hGMT on Forgotten Honor Tournament

Conquest of Java Island


Conquest of Java Island, March, 1942.


The capture of Palembang and the occupation of southern Sumatra by the Japanese Imperial Army had destroyed the last hope of a prolonged defence of Java. Invasion was expected in a matter of days, and civilian evacuees began to flow out from Soerabaja and Batavia. At Tanjong Priok, the port of Batavia, this outflow of evacuees met the inflow of the Royal Netherlands East Indies Army soldiers, airmen, and refugees from Singapore and Sumatra, resulting in the congestion of the harbour and roadstead with shipping, and unloading could only take place as best it could. The quays, sheds, and roads leading from them became blocked with an inextricable confusion of equipment, motor transport, and abandoned cars and goods of every description.

 
Java was defended by British, Australian, and U.S. units (which had entered the war after Pearl Harbor and the fall of the Philippines), commanded by a British Major General H. D. W. Sitwell, and KNIL-forces under command of General Hein Ter Poorten. The only Allied armoured unit in Java was a squadron of tanks from the British 3rd Hussars. The Australian formation — named "Black Force" after its commander, Brigadier Arthur Blackburn V.C. — included the Australian 2/3rd Machine Gun Battalion, the Australian 2/2nd Pioneer Battalion, a company from the Royal Australian Engineers, a platoon from the 2/1st Headquarters Guard Battalion, about 100 reinforcements diverted on route to Singapore, a handful of soldiers who had escaped from Singapore following its fall to the Japanese, two transport companies, a casualty clearing station, and a company headquarters unit. Blackburn decided to reorganize his troops as an infantry brigade. They were well-equipped in terms of Bren guns and light armoured cars, but had few rifles, submachine guns, anti-tank rifles, mortars, grenades, trucks, radio equipment, or Bren gun carriers.


fter discussing war preparation with the commander of the 3rd Fleet and inspecting the 48th Division at Manila on January 21, Lt. Gen. Hitoshi Imamura received an order to attack Java on January 30, 1942. The attack force consisted of 56 transport ships with troops from 16th Army Headquarters, 2nd Division, and 230th Infantry Regiment. The convoy left Cam Ranh Bay on February 18. After 10 days of traveling, the West Java invasion convoy's transport ships, carrying the Nasu and Fukushima detachment, landed at Merak. Other transport ships carrying the Sato detachment landed on Bantam Bay. Meanwhile, the East Java invasion convoy landed at Kragan after successfully defeating the ABDA fleet in the Battle of the Java Sea. On March 1, all ships had reached their designated positions. The KNIL Coastal Detachment Merak, made up from a section of the 12th KNIL Infantry Battalion, under the command of KNIL Captain F.A.M. Harterink, machine-gunned the landing troops, but it was quickly defeated.

 
On March 1 in the afternoon, the troops moved to Serang and established a headquarters there. On the following day, the Nasu detachment arrived at Rangkasbitung and continued to Leuwiliang, 24 km west of Buitenzorg-Bogor. The Australian 2/2nd Pioneer and 2/3rd Machine Gun Battalions were positioned along a riverbank at Leuwiliang, and put up a vigorous resistance. Highly accurate volleys from "D" Battery, U.S. 2/131st Field Artillery, destroyed many Japanese tanks and trucks. After two days of holding up the Japanese advance, Blackforce began to succumb to increasing pressure from Japanese flanking maneuvers and was ordered to retreat to Soekabumi (Sukabumi) after the Dutch withdrawal from Batavia was complete. Around the same time, the Fukushima and Sato units moved westward to Madja (Maja) and Balaradja (Balaraja). After finding several bridges demolished, some of them changed route to capture Buitenzorg as well.

 
On March 4, Ter Poorten decided to withdraw his forces from Batavia and Buitenzorg to reinforce the defence of Bandung. One day later on the evening of the 5th, Dutch troops in Batavia surrendered to the Sato unit. By dawn on the 6th, the Japanese troops attacked Buitenzorg, which was guarded by the KNIL 1st Infantry Regiment, 2nd Infantry Regiment; 10th Company, Landstorm troops, and a howitzer unit. In the morning, Buitenzorg was occupied, while a large number of Allied soldiers had retreated to Bandung. The Nasu detachment pursued them through Tjiandjoer (Cianjur) and Tjimahi (Cimahi). On March 9, the Shoji detachment entered Bandung from the north route through Lembang, and the Nasu unit entered from the west through Cimahi.


1497
General Discussion / Re: FHT - Hall of Fame
« on: 13-04-2010, 16:04:37 »
Ah sorry about that Agro.

Beatifull work!   ;)

1498
General Discussion / Re: FHT - Hall of Fame
« on: 13-04-2010, 15:04:21 »
It gave a whole new tactical approach to the game. Now we just need to adapt to this new style of gameplay and the sky is the limit.

Also thanks to Toddel for designing the radio where you can spawn at, it looks really good.

1499
Rest in peace Rad.

My condolences to the family.

1500
General Discussion / Re: FHT - Hall of Fame
« on: 09-04-2010, 16:04:03 »

Map by Forgotten Hope 2, modifications by Forgotten Honor Tournament


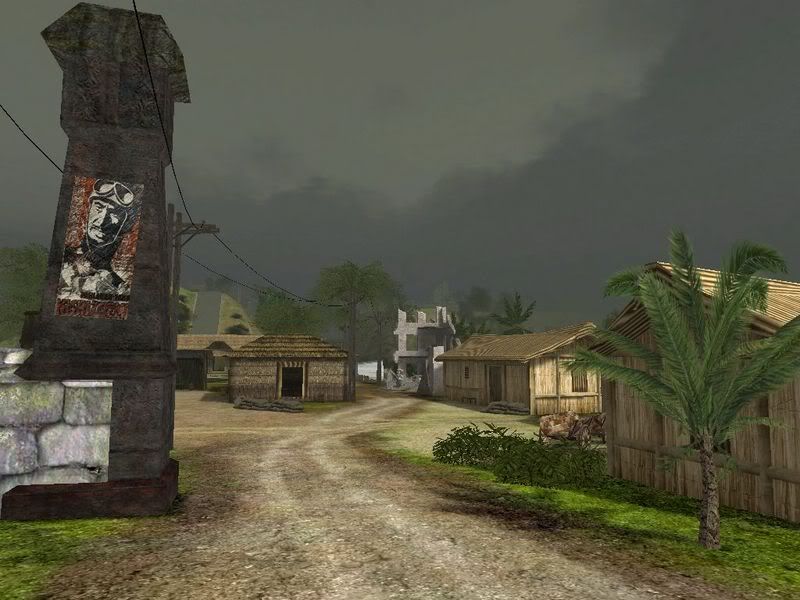
Fort Capuzzo, during Operation Crusader

By the evening of the 25th of November, the German 15th Panzer Division were west of Sidi Azeiz and down to 53 tanks, practically the entire remaining tank strength of the Afrika Korps. Short on supplies and very exposed, the Axis column were close to losing their line of supplies. It's main supply dumps were on the coast between Bardia and Tobruk and supply convoys would have to find a way past the 4th and 6th NZ Brigade Groups.

On 26th of November, 15th Panzer Division bypassed Sidi Azeiz and headed for Bardia to resupply, arriving around midday. Meanwhile the remains of 21st Panzer Division attacked northwest from Halfaya towards Capuzzo and Bardia.  The Italian Ariete Division who were approaching Bir Ghirba from the west, were ordered towards Fort Capuzzo to clear any opposition and link with 21st Panzer. They were to be supported by 15th Panzer's depleted 115th Infantry Regiment which was ordered to advance with some artillery southeast from Bardia towards Fort Capuzzo. The two battalions of 5th NZ Brigade positioned between Fort Capuzzo and Sollum Barracks were engaged by the converging elements of 15th and 21st Panzer at dusk on 26 November.


Battle is Friday April 9th.  Make sure you are one of the many who have signed up for this exciting campaign.  Division are filling fast!  Click on the link below to register.


Pages: 1 ... 98 99 [100] 101 102