I've been playing heavily in LAN for the last two weeks. So far the result is confirming the apparent "bug" or unwanted consequences from the angle mod.
I played numerous times in El Alamein, Eppeldorf, Bastogne, Operation Cobra, Operation Totalize, Operation Goodwood, Villers-Bocage Meuse River, and Alam Halfa.
So far, here are the results of my tank vs tank encounters.
Villers-BocageSherman VC Firefly (me) vs. Tiger I
Result: I win
Distance: Farm flag near the house (me) while the Tiger is near the FlaK 18 just at the front of church ruins.
Shots taken: 3, shell APCBC
Shot 1: Hit the top front hull, register a hit (red circle flashed around the crosshair), the Tiger returned fire.
Shot 2: Hit the track wheels, register a hit, the Tiger wasn't even burning.
Shot 3: Hit the gun mantlet and kills the Tiger.
Cromwell Mk. IV (me) vs. Panther G
Result: Panther wins
Distance: I was at the crossroads bocage, near the flag building, the Panther has just appeared out of the closest junction, north of my position.
Shots taken: 3 (by panther)
Shot 1: Hit me at the front turret, probably at the gun mantlet, health bar red out. My return fire ricocheted off its gun mantlet.
Shot 2: Hit me frontally, health bar near exhaustion, my return fire to the tracks register a hit.
Shot 3: Hit me in the tracks, I retreated and exposed my flanks, I was instantly killed.
Tiger I (me) vs. Sherman V
Result: I win
Distance: I was at the bridge crossing the main river, the Sherman has just made a turn towards me from the T-intersection from the farm flag to the road that connects the bridge.
Shots taken: 2, shell APCBC
Shot 1: Hit the turret side, the Sherman burned, but it kept charging forward and the turret started to turn into me.
Shot 2: Hit the front hull, kills the Sherman.
Operation TotalizeChurchill V vs. Panther A
Result: I win
Distance: I was just exiting the alt. bridge crossing into FlaK battery flag, and the Panther is at the other bridge mouth crossing into the Windmill flag.
Shots taken: 3 hits (by Panther, against me), 5 shots (by me, all hits) APCBC shells
Shot 1 (me): Hit the panther at the side turret, hit registered. He begins to notice.
Shot 2 (me): Hit the panther at side hull, registers a hit.
Shot 3 (Panther): Hit me frontally, probably to one of the track mud guards. Health bar reduced by 1/4.
Shot 4 (me): Hit the Panther at side hull (probably the track wheels), registers a hit, the Panther burns.
Shot 5 (Panther): Hit me at the side (extremely angled shot, my health bar barely reduced).
I was frustrated, so I moved forward, and the Panther took the chance to fire again.
Shot 6 (Panther): Hit me at the side (slightly angled shot), my health bar is now 1/2 full.
Shot 7 (me): Hit the gun mantlet and kill the Panther.
Tiger I (me) vs. Cromwell IV
Result: I win
Distance: I was about crossing the bridge to the Windmill flag, the Cromwell has just turned at the T-intersection to the road ahead of me from the mainbase.
Shots taken: 2 (Cromwell), 5 (me), shell APCBC
Shot 1 (me): Hit the Cromwell frontally, registers a hit. The Cromwell evasively ditched to the roadside.
Shot 2 (me): Hit the Cromwell (wasn't clear), registers a hit, probably scraped its paint along the side hulls.
Shot 3 (me): Another hit registered, the Cromwell tilted slightly to the left when he ditched, probably landed along the side hull. So I adjust my aim.
Shot 4 (Cromwell): Hit me at the front hull and reduced my health bar by almost 1/3.
Shot 5 (me): Hit the Cromwell frontally, registers a hit.
I approached the Cromwell, fired another shot that misses. Then continues to cross the bridge.
Shot 6 (Cromwell): Hit me at the gun mantlet (probably), barely reducing the health bar.
Shot 7 (me): Hit the Cromwell frontally and kills it.
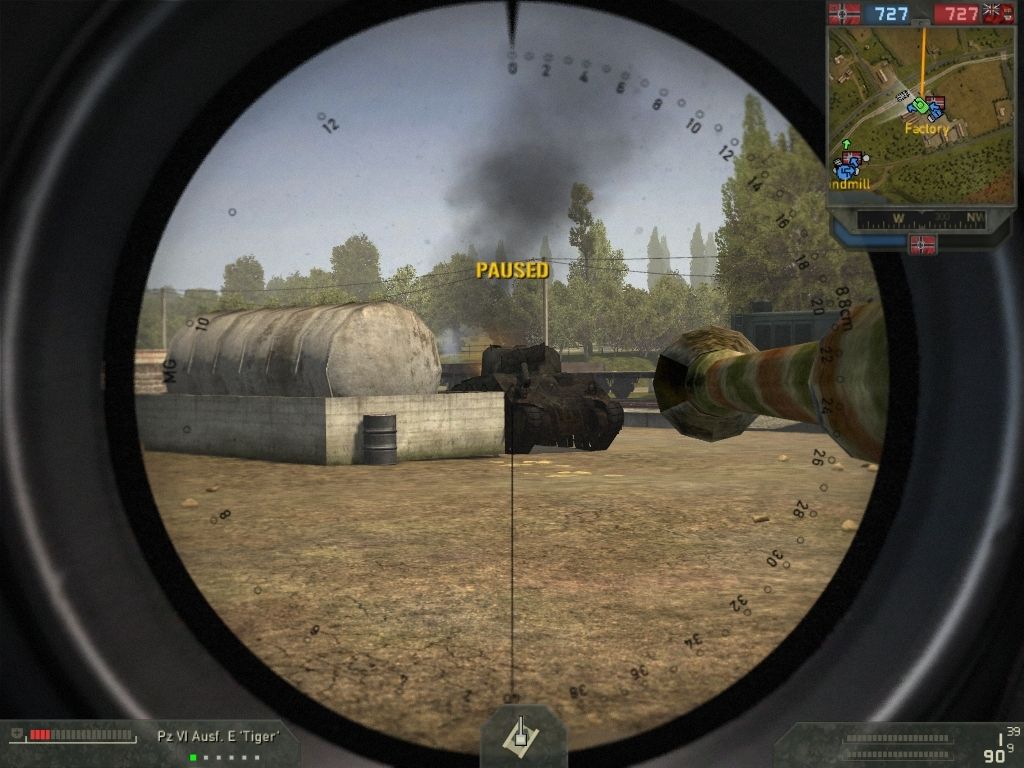
Tiger I (me) vs. Sherman VC Firefly
This is not long after the Cromwell encounter above, I managed to travel into the factory (German flag), passing by several defenders of Windmill flag (in Canada team's hand) to support the defense there.
Result: I win
Distance: I was entrenching myself at the Factory flag sandbags, at the exact position where the FlaK 18 cannon was before being destroyed by a Typhoon. The Firefly approached from the train station, a near point-blank distance. He managed to surprise me by landing the first shot.
Shots taken: 2 (by Firefly), 2 (me), APCBC shells.
Shot 1 (Firefly): Hit me at the side turret (maybe), my health bar reds out.
Shot 2 (me): Hit the Firefly at the front hull, hits registered and it burns.
Shot 3 (Firefly): Hit me somewhere, health bar is reduced slightly, I was frantically clicking the fire button.
Shot 4 (me): Hit the Firefly at the same spot, killed it instantly.
These are the encounters I remember exactly. Red text indicates probable unrealistic events.


