Update with funky drawing! No I didn't smoke something or took some stuff... it's just I that I'm really a noob with photoshop hand drawing.

Current map to-do status:
- minimap for testing done
- a lot of artwork improvement done. Looks still not how I wish it looked.
- refining a lot of statics. needs still some rework on the oldest parts of the map. I clearly note the difference between the early stages of the map and my current editor abilites.
- undergrowth not everywhere cleared where there should none of it. but that's a minor part.
It's time to show you some of the gameplay elements that form the map. I don't want to upload all my crazy hand drawing that were used as the source for it.
Ingame map with the flags:
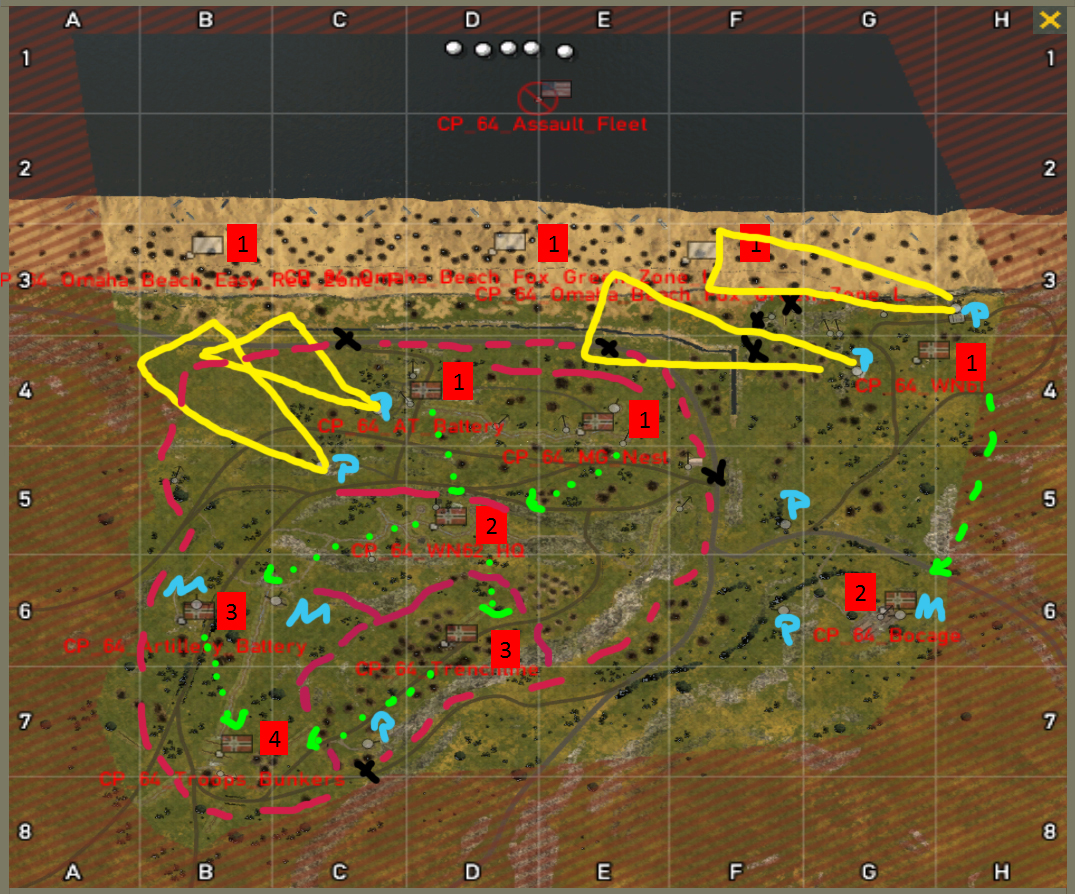 Flags:
1) these flags can be attacked by the Americans right from the start away. Please note that the view on the map is only the American. The Axis can't go too near to beach except on the WN61 where they can reach the cliffs.
2) WN61 opens the attack for Bocage; The Battery & MG Nest open the attack for the WN 62 HQ.
3) The WN62 HQ is needed to attack the positions marked with a 3.
4) Final flag - axis encirclement.
X-es:The black crosses are entry points for the allieds. As in reality the allieds can only enter the Widerstandsnester at some points. Both areas have 3 entries to force the axis forces to spread out - weakening their defense lines to enable partial allied breakthroug.
Pinkish lines:What you cannot see on the map are the barbed wires, farm walls & wood fences that form the sub battlefields. When I planned the map I already put some combat zones on the drawing to force the gameplay into certain map areas. The 3 types of fences used (barbed wires, farm walls & wood fences) work together with various trenches, bushes & bomb craters and form the corresponding combat zones. Due to the amount of such objects I couldn't draw all of them by hand on the map. You'll find some screens down this post.
Blue-Green writings & yellow area:I often heard that the current beach statics couldn't handle the real use. Meaning: in reality they were shooting far beyond map scales. That's right so I made a twist with them. The 4 bunkers that can partially launch bombs on the beaches all fullfill a certain mission.
H3-Bunker: this regelbau is fictive - in the sense in reality it was in WN60 which was another few 100m down the coast and higher up. In reality it fired on the colleville beach. I placed this bunker down there to simulate the harsh bombardment.
G4-Bunker: this regelbau was as well further to the east and contained a PAK 43 which also fired on the beach down the colleville draw. It was as well thought to protect against enemy incoming tanks. When the tanks arrived at the turning point of the battle the WN61 was already in Allied hands. The PAK 43 is replaced with a Pak40 and can only partially shoot on the beach. It's main designation is to protect the street between the mine field and the waterditch.
 C4 & C5-Bunker
: This bunkers protect ingame the place where the allied tanks must leave the beach. In reality the allied tanks were really desperate to find a way out from the colleville beach - being under fire and confronted with a deep waterfilled tank ditch and facing mines all up the hill. The narrov street forced them on the path to colleville. This place was in reality covered by the above mentioned bunkers. In reality the bunkers in C4 & C5 (which by the way have their exact real position) shot down almost to the charlie sector and were filled with Czech guns. They are replaced with Pak40s.
Mortars: there were 5 mortars and 1 LeFH18 battery shooting on the beach which would have been insane ingame. I reduced them to 3 mortars which can not refill their amo. This will lead to a very harsh beginning for the allieds to simulate the very bloody beginning of the battle but as well the weakening of the german troops confroted with amo shortage all the way.
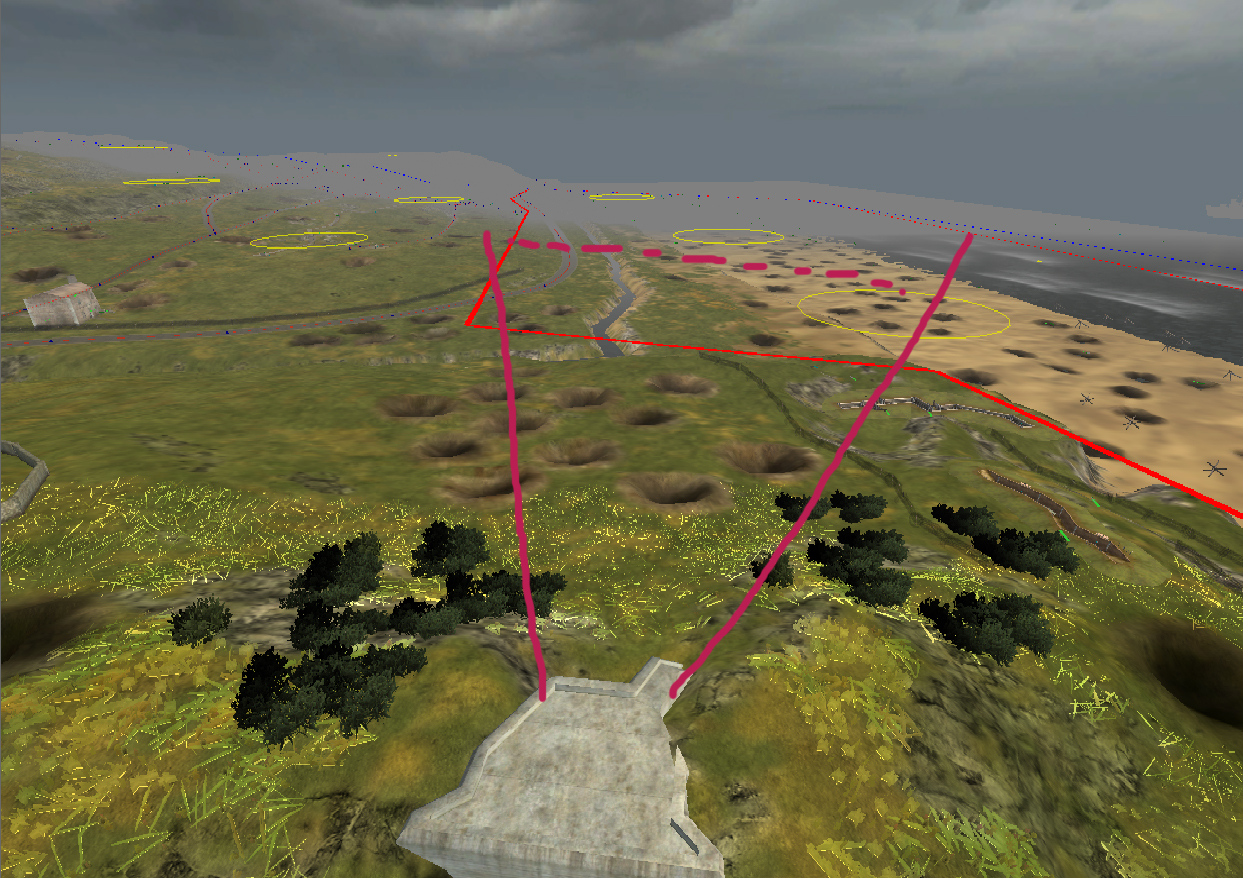
Attack routes & combat zones:I thought some of you want to know how the real fight is supposed to take place and with which tools I want to achieve that. Here we go.
- Primary objective: the allieds must land on the beach under heavy fire. The germans have during the first 90 seconds close to the beach spawnpoints. Meaning: the spawn right next to the big guns MG's etc. The germans were well awake & prepared when the first allieds made it to the beach so this is fair enough. The naval & aerial bombing did not work as supposed and caused only damage far behind the lines.
Note: the allieds get saver spawnpoints after 10 minutes (well have to test with the necessary time) by dummy timed flags.
- Secondary objective: the flags on the first lines can be attacked right from the beginning - but getting the beach flags helps of course. People can spawn either on the gained beach-spawns or in the landing vehicles that remain some time on the beach. All spawnpoints are in bomb craters or behind destroyed landing crafts. This helps to protect allieds from beeing shot down right on the spawn.
WN61-Note: Taking out the WN61 is key for a calmer beach. It enables the flanking for the further flags and is a good help for the allieds as in reality.
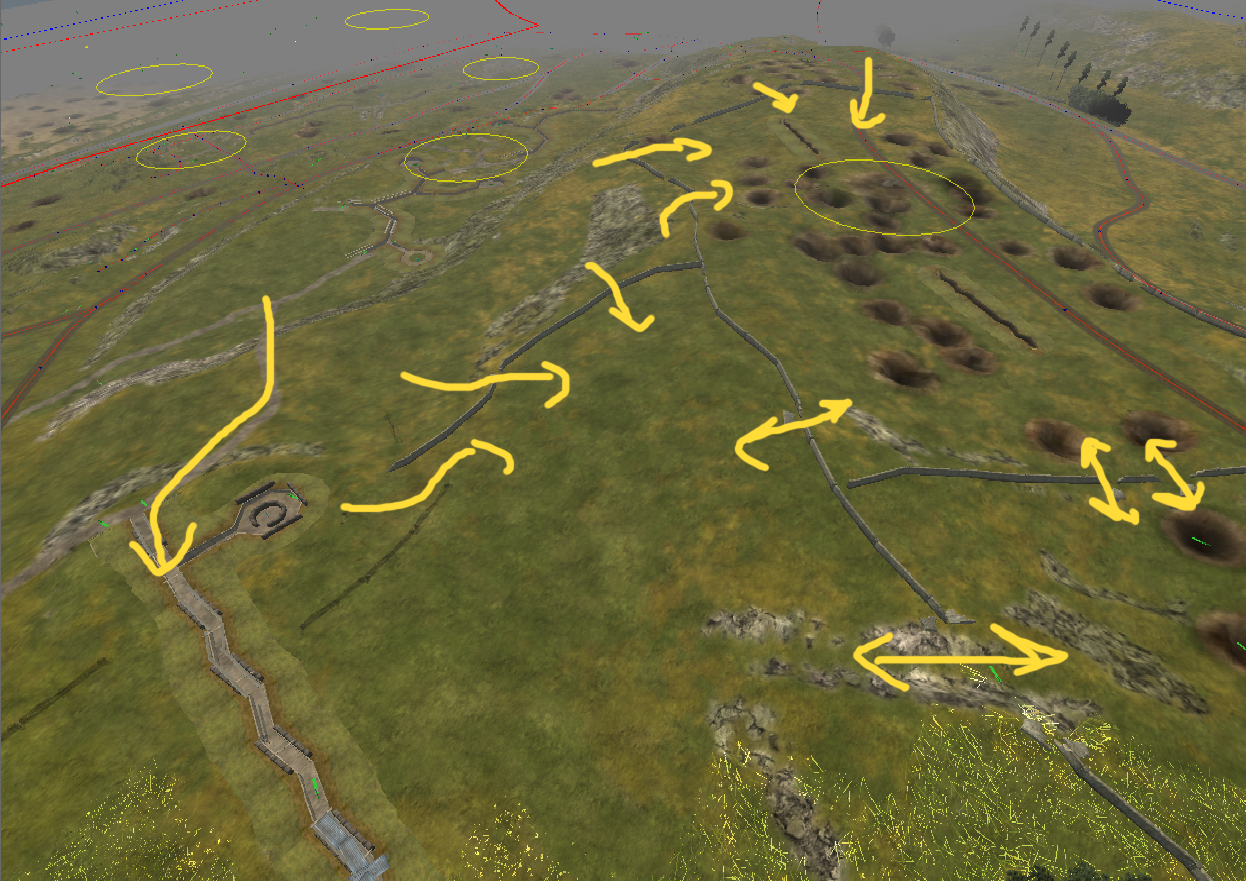
You can see the attack routes on the following screenshot. Yellow arrows are the possible attack routes; cliffs & barbed wires forcing the gameplay & fight for the flags in the right direction. Pink are MG position (4x MG 34 + 1 MG 42).

WN62 MG Nest This Position is the first defense line of the WN62. I like to show you the core of the attack place.
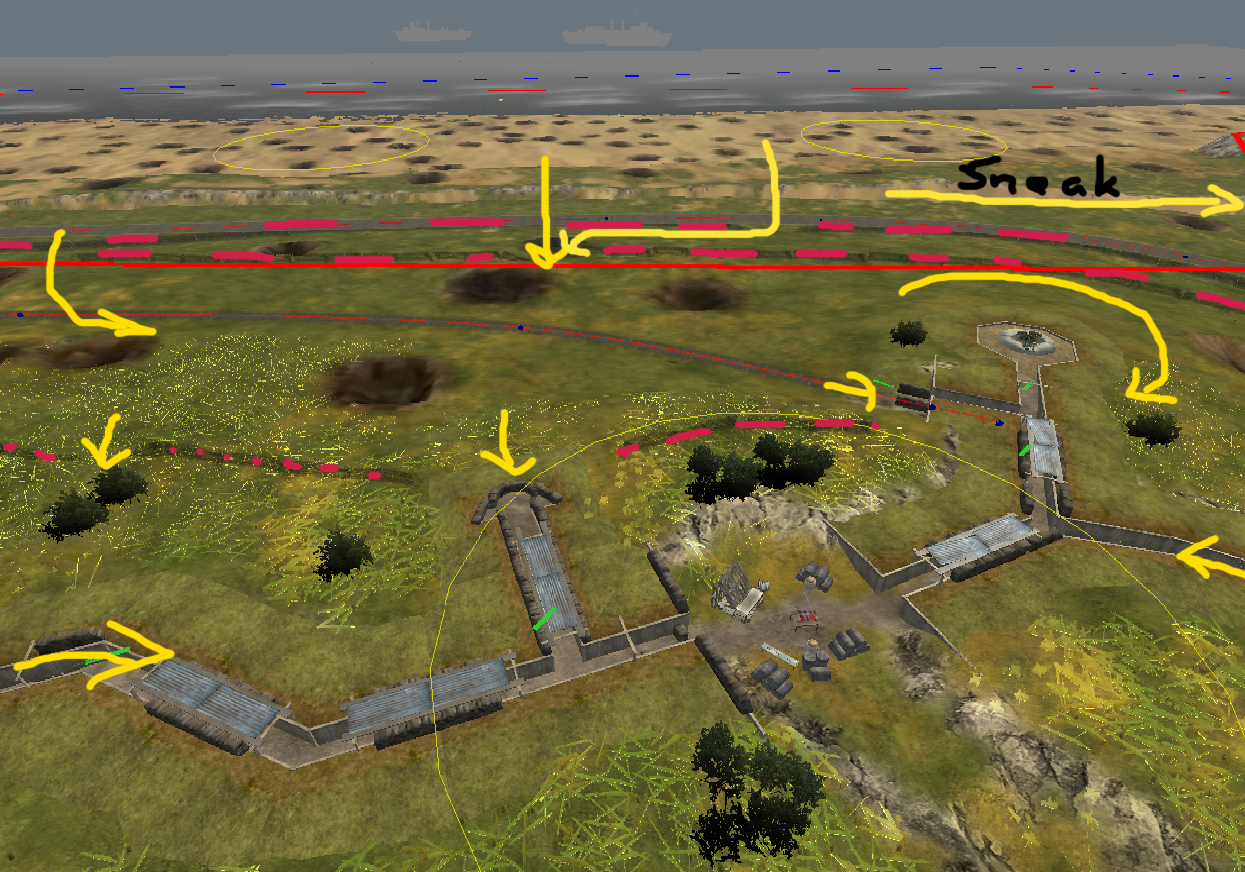
There are only 4 attack possibilites + 1 saver sneak path. All flags contain a rather saver sneak path to enable flanking. This flag has 3 MG34 & one MG42 Lafette in house which is outside of the screenshot. One 5cm KWK is on as well part of that line.
WN62 AT Battery: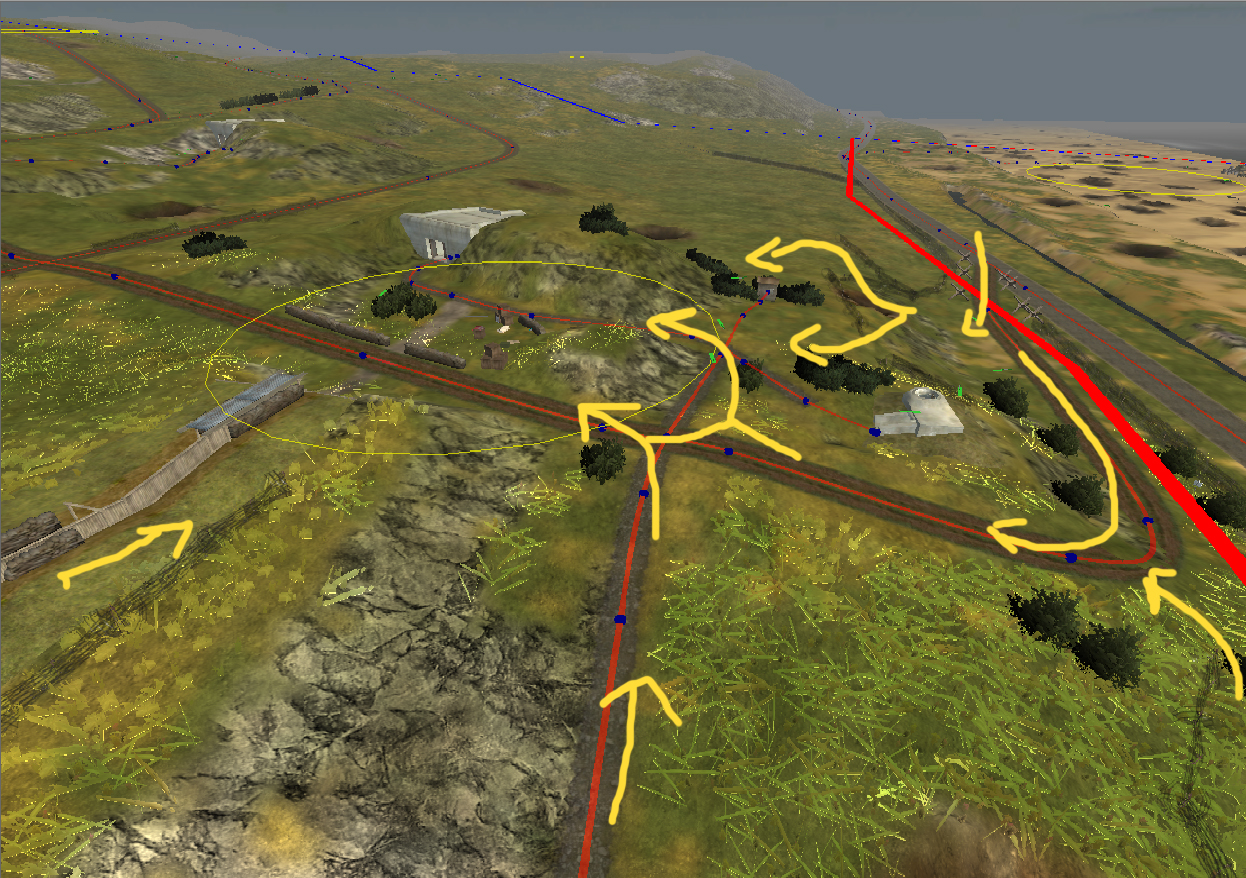
The other third 1 defense line flag. Please not that the barbed wires in the back of the map continue - they don't appear cause of the viewdistance. Once again you see clearly defined attack routes - allieds can only attack on around 4 possible ways. Taking this flag will ensure that allied reinforcements can make their way up.
Summary note:This system of limited entry & exit points continues on all flags. All spawn points should be save from spawnrape as not beein in the attack routes are split up quite strict.
I like to show as an example some part of the uphill area which contains clear combat areas with walls. Hiding places are bushes (not visible), bomb craters & trees. Flankin is possible but it's crucial to pass the entry points. Tanks cannot move freely on the map due to minefields, walls etc.
cheers,
Nissi

